


I have had this project idea in the back of my head for a while after seeing that the Penn Museum had published a fantastic page on making cuneiform pictogram biscuits. When I started reading Jean Bottéro's "The Oldest Cuisine in the World -- Cooking in Mesopotamia", I began reading more about the cuneiform writing system itself and how the glyphs and pictograms evolved and were impressed into the clay tablets that Bottéro refers to in his book. I loved Penn Museum's edible rendition so much that I decided to take it to the next level by making a full-sized tablet based on a slab that I had photographed in the Assyrian rooms at the British Museum. I made smaller tablet biscuits as well. For me this particular project was intriguing for two reasons: the final result was stunning and made for a damned fine looking gingerbread tablet; and I actually became quite adept at impressing cuneiform after my first few clumsy attempts. The process and the result were so enjoyable that I decided to publish this post just in time for the holiday baking season. This post will therefore also be published just in time to catch all of my archaeologist buddies going on their holiday breaks. This means that they will likely read it in the days to come and proceed to send me late-night, whisky-fueled emails correcting me that the Mesopotamians did not make gingerbread cuneiform tablets... and they'd be right. But sometimes a girl has to have a bit of fun in the kitchen, nay? And that's what this recipe is all about: fun. So much so that I wanted to share it with all of you. But before we all become seasoned gingerbread cuneiform scribes... let's explore a bit of the history first.
A Brief History of Cuneiform
Cuneiform is an ancient writing system, that is to say one of the first physical and permanent representations of language, that was developed in the 4th millenium BC by the Sumerians of Mesopotamia. Mesopotamia is now modern-day Iraq and once encompassed the fertile agricultural region between the Tigris and Euphrates rivers that made up the eastern portion of The Fertile Crescent. Early cuneiform (proto-cuneiform), like many early writing systems, was comprised of pictograms, or symbols that symbolised objects or meaning. As the system evolved over 2,000 years the symbols changed to a more regulated and stylised system using a system of wedge-like conical glyphs.
The earliest known surviving piece of written literature, an epic poem entitled "The Epic of Gilgamesh", was written in 2100 BC on cuneiform tablets; some of the best examples of this story were found on tablets which were excavated from the library of the Assyrian king 'Ashurbanipal'. The Epic of Gilgamesh is one of the first earliest pieces of ancient literature to address the human struggle with life and mortality and the poem can still be read in its entirety today.
In addition to epic poems, Mesopotamian cuneiform tablets have also put forth the earliest known recipes that exist in the archaeological record. Jean Bottéro (2004) documents that three tablets that had long been held in a collection in the Yale University Babylonian Collection had revealed 350 lines of script that contained approximately 40 recipes for Mesopotamian cuisine that was en vogue around the Mesopotamian hearth in the mid-2nd century BC. Bottéro also presents a translation of these tablets that can be read today.
The cuneiform writing system was in use, in its various forms and adaptations, for a period of almost 4,000 years. It was the precursor to the alphabetic writing systems that would later be used by the Greeks and Romans.
If you'd like to read more than just a cursory introduction to cuneiform then you'll want to spend a few days here to start: The Cuneiform Digital Library Initiative then head on over to the Yale Babylonian Collection for a day or four. But before you put your toe in that water you should really hone your scribing and baking skills! So let's get cracking, shall we?
Edible Archaeology: Gingerbread Cuneiform Tablets
Ingredients (Makes 1 large cuneiform tablet and 20 small tablets, or 40 small tablets)
- 3 cups of white flour
- 1/2 cup of brown sugar
- 3/4 cup of butter
- 2/3 cup of molasses
- 1 egg
- 1 teaspoon of baking soda
- 1 teaspoon of ginger
- 1/2 tsp of cinnamon
- 1/2 tsp of nutmeg
- 1/2 tsp of salt
- 1/4 tsp of crushed red pepper flakes
Implements
- Parchment paper
- A sharp knife
- A set of untreated, square-headed, wooden chopsticks
Preparation
1. Begin the preparation process the night before you intend to bake. The gingerbread must be cooled for several hours before handling and baking.
2. As you begin to mix the dough, make sure that your butter has been portioned and has been resting out of the fridge for about 20 minutes prior to mixing.
3. Put all of the ingredients together in a large mixing bowl, or an electric mixing bowl, and blend thoroughly until the ingredients have been creamed nicely together. It's going to be quite stiff but this is fine. Compress the dough together into a round wad.
4. Cover with plastic wrap and place the bowl into the fridge to chill overnight. The gingerbread dough can stay in the fridge overnight or for a period of up to two days as long as it is covered.
5. When you're ready to prepare the gingerbread tablets remove the gingerbread from the fridge and place it onto some parchment paper. You'll also want to put a damp towel underneath the parchment paper, between it and your flat work surface, to keep the paper from slipping as you roll out the gingerbread.
6. Begin to roll the gingerbread out onto the parchment paper. You're going to have to assess how malleable the gingerbread is by leaving it sit a while and returning to it if it's initially too stiff. Gingerbread is a bit fussy as it needs to be handled when it's cooler than room temperature but not as cold as when it's refrigerated. You'll notice that the dough is beginning to cooperate when it warms up and you can roll it easily.
7. If you're making the full-sized tablet, flatten the gingerbread out into a slab that will fit well onto your baking sheet. My tablet measured 12" x 9" and I baked it on a sheet that measured 10" x 15". You want to achieve a thickness of about 1/4″ for your large and small tablets so as you roll, cut off the jagged tops, bottoms, and edges to help you form a rectangular shape. You can use the remaining dough to make the smaller tablet biscuits. If you are going to opt to make only the small tablet biscuits, you call roll the gingerbread out solely with the intention of making sure that the thickness is approximately 1/4". Use any remaining gingerbread dough by rolling it into an additional slab onto parchment paper at a thickness of 1/4", cutting edges as you go to create a square or rectangular slab.
8. After the rolling is complete, refrigerate the gingerbread slabs again for 30 minutes. This is suggested so that the dough will firm up again enough to impress the cuneiform wedges without the dough sticking to the stylus. Once the dough is chilled again it's time begin scribing!
Scribing the Cuneiform
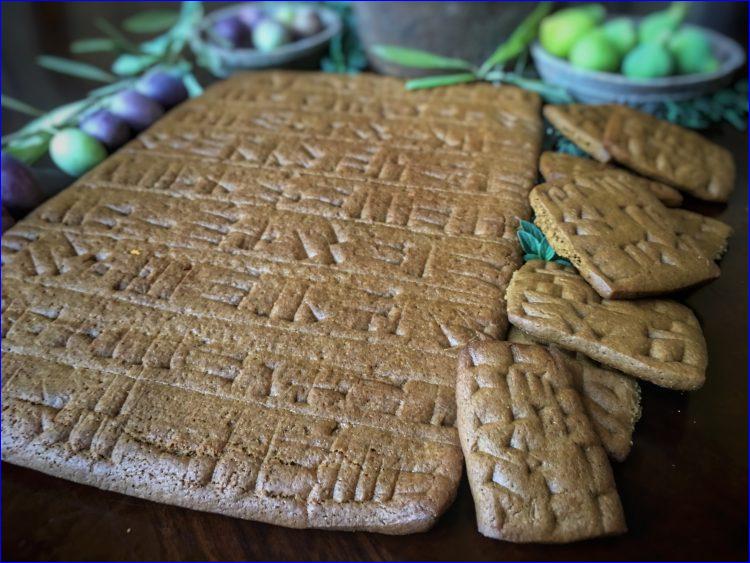
1. Before we begin, let's have a look at the image above. This is the image I chose to work off of for my large tablet. You can work off of any cuneiform tablet or style that you prefer but the makeshift stylus that we'll use is most useful when replicating the wedge style of cuneiform glyph as seen in the image above. This is a photograph that I took of a cuneiform tablet from Room 10 at the British Museum; it is an Assyrian tablet (Nimrud) dated to the 9th century BC.
2. This stage of the process is where things start to get very exciting. A generic set of untreated, wooden chopsticks are now going to take on a whole new value to you. Who knew that these common, disposable household utensils would make perfect cuneiform styli? The wonders never cease around here...
3. Take your gingerbread tablet out of the fridge now and place it in an area where you'll have enough light to work over it for about 20 minutes as you begin to get a feel for the base and your stylus. Have a look at the image above, or your preferred wedge-style cuneiform image, and think about vertical and horizontal spacing for a minute before you proceed. If you prefer to use a test slab before you start on the large slab, that is probably wise. Here's how to get a good handle on your stylus:
4. Take the chopstick in your writing hand and find the sharpest and tallest corner on the head. These chopsticks are never perfectly cut so you'll definitely find an edge that is more prominent than the others. This will be the point that you'll use again the slab of gingerbread. The point of the head will therefore be facing the gingerbread like a diamond, not a square, as seen in the image below. The angle of the stick, in relation to the slab while you're working, will be between approximately 30 to 40 degrees, again as pictured below. That angles will ensure that you have a nice point and tail on your wedges.
5. Begin at the top of the tablet and move from left to right. As you finish each row you can use a sharp knife to draw a horizontal line underneath each complete row before you scribe the row beneath it. Using the stylus may feel odd at first but here's the trick. Point the corner of the head into the slab at the 30 degree angle and then gently press the head downwards, pop the stylus up slightly and then pull the stylus up off of the slab. Not too forcefully, not too slow. Just give the stylus a light pop upwards after you've impressed the corner of the head into position. This will ensure that the glyph has a well-defined head in addition to the tail which is impressed during the first lower movement. See the video below to watch the impressing process close-up. The first few glyphs are going to feel awkward and sloppy but before long you'll be scribing cuneiform wedge poetry blind-folded that will put Enheduanna to shame. Feel free to copy the script exactly or create your slab in a free-style form like I did. I did my best to copy the glyph forms chronologically but it's not exact. I have no idea what I've written here either; it could be the Epic of Gilgamesh or a recipe for a goat fondue... Who knows!
6. Carry on scribing until you've finished your tablet and any smaller tablets. If you make a horrible mistake, you can always ball it up, roll it out, chill it and start again. I'm sure our Assyrian friends did the same with their clay from time to time. If you find that the stylus tip begins to pick up dough or get clumpy, give it a rinse and a wipe.
7. Once you've completed the scribing preheat your oven for 350 F / 175 C / Gas Mark 4. Then chill your tablets in the fridge one more time while the oven is preheating. This is going to seem odd but there's a good reason why we'll chill the slab one more time: The recipe for this gingerbread won't spread like a typical biscuit when being baked in the oven but it will expand slightly. If you chill the finished slab a bit before baking it will keep the dough from expanding immediately as it bakes and will allow the definition of the wedges to remain more intact.
8. Once the oven is preheated, bake the slab for 10-15 minutes (depending on the thickness of the dough) and watch for browning of the edges or any moisture or sheen remaining on the tops. This is a good indicator of how well cooked the dough is. Once the top is uniformly baked and the edges start to brown, take the tablets out of the oven gently and let them cool for a few hours to room temperature. They'll need this time to firm up as well so that they're durable and crispy.
Et voila! You've done it. Not only have you made a batch of delicious gingerbread but you've also learned how to create cuneiform wedge glyphs using a substitute stylus! But it's not over yet, good readers..... Herein lies the toughest challenge of all with respect to this recipe: Eating the tablets! If you're anything like me, you're going to be so pleased with the outcome that you'll want to display your tablet in a glass case in your front room and charge admission to see it. But alas, these cuneiform tablets are edible archaeology and like all archaeological data they are meant to be shared! ...But not before taking several hundred photos of them and putting them up on Facebook!
If there's anything that came out of this project for me, it was a newly found love of gingerbread and a intensified curiosity about the structure and evolution of cuneiform. It is deeply intriguing to study one the earliest advanced writing systems that human beings created. Cuneiform provides us with incredible insight into early literacy, writing systems, value systems and administrative processes in Bronze Age Mesopotamia. There is so much to observe in these scripts outside of the information that we can glean from the translations alone: From the tablets and glyphs themselves we can observe intention, forethought, care, workmanship, planned use of space, artistry, style, and evolution of form. We can also imagine what the stylus may have looked like based on the shapes that it made in the base. A split and blunted reed shaped as a stylus is what is commonly understood to have been used to impress cuneiform. Taking a brief moment to replicate these glyphs myself, using a modern substitute stylus (a chopstick), allowed my hand and my brain to grow accustomed to the feeling of the cuneiform impression process. This process slowly became more intuitive as I worked row after row on my base, all the while staying keenly aware of space allowance, positioning of the stylus, pressure applied, and glyphs created. Throughout the process it was an incredible feeling to imagine what it must have been like to work with a communication directive and to understand exactly what was being impressed. Perhaps that will be my next adventure! For now, though, I'm going to covet my cuneiform tablet for one more day and then tomorrow I shall have it for breakfast with a nice cup of tea.
Happy Holidays and good eating to you!
or register to post a comment.